Overview
Spring Batch is a framework for processing large amounts of data in a batch-oriented way.
- Instead of processing data one piece at a time as it comes in (like a cashier at a store), Spring Batch processes large chunks of data all at once, in a scheduled and automated fashion.
- Think of it as an assembly line for data.
- This is useful for tasks that are too slow or resource-intensive to run in real-time, such as:
- ETL (Extract, Transform, Load): Reading data from a database, converting it to a different format, and writing it to another database.
- Reporting: Generating daily or monthly reports from a large dataset.
- Data Migration: Moving large amounts of data from an old system to a new one.
- intended to work in conjunction with a scheduler rather than replace a scheduler
- provides reusable functions that are essential in processing large volumes of records, including logging and tracing, transaction management, job processing statistics, job restart, skip, and resource management
- OFFICIAL DOCS
Advantages
- Chunk processing - Spring Batch reads transactions for a few hundred customers are a time, processing them in chunks, and writes them to the statements in bulk
- Scheduled Execution - Set up the job during off-peak hours
- Error Handling and Retry - If there’s any errors while processing a batch, Spring Batch can automatically retry the step or skip the problematic data and continue with the rest, logging issues for further review
- Restartability - If a job fails midway through generating 10,000 statements, Spring Batch can restart from where it left off, ensuring every customer receives their statement without duplication
Core Components of a Spring Batch Job
- A batch job has a simple, assembly-line structure.
- This “read-process-write” pattern is the heart of Spring Batch.
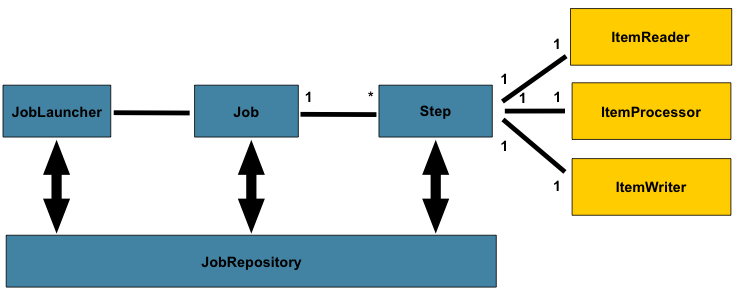
- Job:
Job Launcherwill start a job- The entire batch process!
- Container for step instances ⇒ composed of one or more “steps.”
- 1 process = 1 job
- Step:
- A self-contained phase of a job. A simple job might have only one step, like “process a file.”
- Each step has a different purpose and they will run one by one in a sequence
- Each step will have a
StepExecution→ a single attempt to execute a Step - A step consists of an
ItemReader,ItemProcessor, andItemWriter.ItemReader: Reads data from a source, one item at a time. The source could be a database, a CSV file, a message queue, etc.ItemProcessor: (Optional) Transforms the data. This is where you apply business logic, like filtering out records, converting data types, or performing calculations.ItemWriter: Writes the processed data to a destination, usually in chunks (e.g., 100 items at a time) for efficiency.
- Job Repository
- A core component that provides persistence for the framework’s metadata
- responsible for creating and updating information about job executions, step executions, and other details in a database
- The “memory” or “state-tracker” for all your batch jobs
- persistence is crucial for features like restartability
- If a job fails midway, the
JobRepositoryknows exactly which step failed and where it left off, allowing Spring Batch to resume the process from that point!
- If a job fails midway, the
- key responsibilities
- Create, Retrieve, Update, Delete (CRUD) Operations: It manages the lifecycle of batch domain objects like
JobInstance,JobExecution, andStepExecution. - State Management: It keeps track of the current status of a job (e.g.,
STARTED,COMPLETED,FAILED). - Concurrency Control: Ensures that only one instance of a specific job (defined by its name and parameters) can run at the same time.
- Create, Retrieve, Update, Delete (CRUD) Operations: It manages the lifecycle of batch domain objects like
- A core component that provides persistence for the framework’s metadata
ItemReader, ItemProcessor, ItemWriter
- diagram
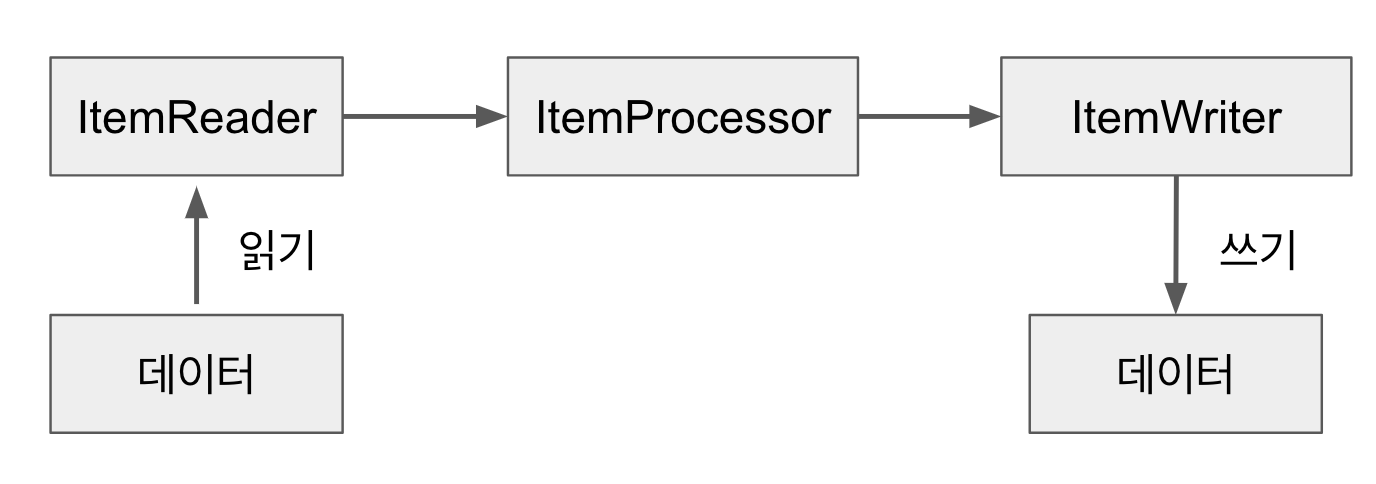
- They work together in a specific loop called chunk-oriented processing
- The
readerandprocessorwork one item at a time, while thewriterworks on a whole “chunk” of items at once.
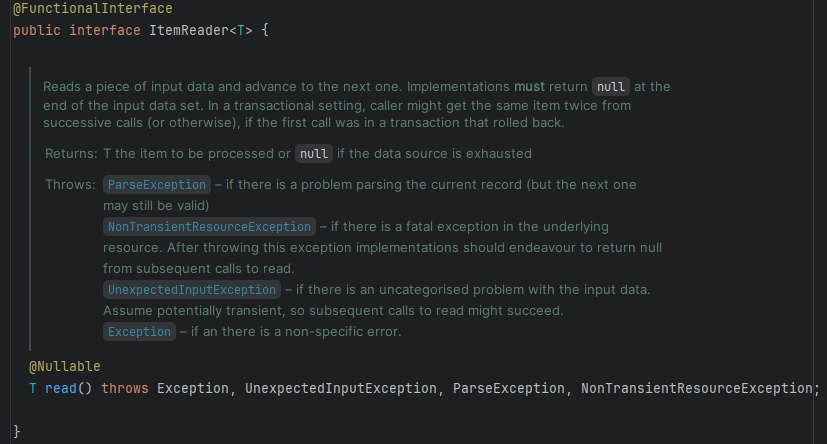
- The
ItemReader
- Look at the interface
Main implementations (pre-built readers)
For files
For database
JdbcCursorItemReader- Cursor-based reading- It opens a single database connection and executes one SQL query. It then “streams” the results back one row at a time using a standard JDBC
ResultSet. The connection stays open until the reader has gone through every single row - Like a straw in your drink and sipping continuously lol
- It opens a single database connection and executes one SQL query. It then “streams” the results back one row at a time using a standard JDBC
@Bean
public JdbcCursorItemReader<User> userCursorItemReader(DataSource dataSource) {
    return new JdbcCursorItemReaderBuilder<User>()
        .name("userCursorItemReader")
        .dataSource(dataSource)
        .sql("SELECT id, name, email FROM users ORDER BY id")
        .rowMapper(new BeanPropertyRowMapper<>(User.class)) // Maps a row to a User object
        .build();
}JdbcPagingItemReader- Paging-Based Reading- More robust and scalable approach, like reading a book page by page
- It reads data in “pages” (chunks). For each page, it opens a connection, runs a new SQL query to fetch only that page’s data (e.g.,
SELECT ... LIMIT 100 OFFSET 200), processes the results, and then closes the connection. When the next page is needed, it repeats the process.
@Bean
public JdbcPagingItemReader<User> userPagingItemReader(DataSource dataSource, PagingQueryProvider queryProvider) {
    return new JdbcPagingItemReaderBuilder<User>()
        .name("userPagingItemReader")
        .dataSource(dataSource)
        .queryProvider(queryProvider) // Special provider that generates page-specific SQL
        .pageSize(100) // How many rows to fetch per page
        .rowMapper(new BeanPropertyRowMapper<>(User.class))
        .build();
}JpaPagingItemReader- The JPA equivalent of the
JdbcPagingItemReader - Use it when your application is already built using JPA (Java Persistence API) and you want to read data as entity objects
- Choose the right tool
JdbcPagingItemReaderis like using a precise recipe and measuring cups. You write the exact SQL (SELECT id, name...) and manually specify how to map the results to an object (RowMapper).JpaPagingItemReaderis like telling a smart cooking robot, “Get me all theUseringredients.” The robot already knows what aUseris (from your@Entityclass) and figures out how to get it from the database itself.
- Still reads data in chunks or “pages” like
JdbcPagingItemReader, but higher abstraction- Query Language: Instead of raw SQL, it uses JPQL (Java Persistence Query Language). You write queries against your Entity objects, not your database tables (e.g.,
FROM User uinstead ofFROM users). - Object Mapping: It works directly with your JPA
EntityManager. This means you get fully managed, hydrated@Entityobjects back from theread()method automatically. There’s no need for aRowMapper. - Database Agnostic: Since JPQL is part of the JPA standard, your query is generally portable across different databases (e.g., MySQL, PostgreSQL) without changes.
- Query Language: Instead of raw SQL, it uses JPQL (Java Persistence Query Language). You write queries against your Entity objects, not your database tables (e.g.,
- The reader must be configured with an
EntityManagerFactory.- Needs this because it’s the core engine or JPA. JPA - EntityManager
- All entity access is performed within a new transaction, independent of any existing Spring managed transactions.
- Doesn’t need to know the specific repository; it finds data by combining 2 things
- The
EntityManager(which knows about all your entities). - The JPQL query string (which tells it which entity you want).
- The
- Convenience & consistency!
- The JPA equivalent of the
@Bean
public JpaPagingItemReader<User> userJpaPagingItemReader(EntityManagerFactory entityManagerFactory) {
    return new JpaPagingItemReaderBuilder<User>()
        .name("userJpaPagingItemReader")
        .entityManagerFactory(entityManagerFactory) // 1. Use the JPA EntityManagerFactory
        .queryString("SELECT u FROM User u ORDER BY u.id") // 2. Write a JPQL query
        .pageSize(100) // 3. Set the page size, same as before
        .build();
}RepositoryItemReader- AN EVEN SIMPLER WAY if you’re using Spring Data JPA!
- reader is a wrapper that lets you use your existing
PagingAndSortingRepositoryinterfaces directly, no need to write the JPQL query
@Bean
public RepositoryItemReader<User> userRepositoryItemReader(UserRepository userRepository) {
    return new RepositoryItemReaderBuilder<User>()
        .name("userRepositoryItemReader")
        .repository(userRepository) // 1. Just provide the repository bean
        .methodName("findAll")      // 2. Specify the method to call
        .sorts(Collections.singletonMap("id", Sort.Direction.ASC)) // 3. Provide the sort order
        .pageSize(100)
        .build();
}ItemProcessor
- optional
- the input must match the reader’s output type
ItemWriter
Process Example
- Visualizing the Flow (with
chunk size= 10) - 🔄 Start Transaction 1
read()→ gets item 1process()→ processes item 1 ➡️ Add to List (List size: 1)read()→ gets item 2process()→ processes item 2 ➡️ Add to List (List size: 2) … (This repeats 8 more times) …read()→ gets item 10process()→ processes item 10 ➡️ Add to List (List size: 10)- CHUNK IS FULL!
write()→ gets the entire list of 10 processed items. Writes them all. ✅ Commit Transaction 1
Simple Java Example (From official docs)
Reading a CSV and Printing to Console
- Let’s imagine we have a
people.csvfile with this content:
firstName,lastName
John,Doe
Jane,Smith- Our goal is to read this file, convert each person’s name to uppercase, and print it to the console.
The Data Object(POJO) to hold our data
public class Person {
    private String firstName;
    private String lastName;

    // Constructors, getters, and setters...
}
The Item Processor (PersonItemProcessor)
- This class transforms the data → takes a
Personobject and returns a new one with the names in uppercase.
import org.springframework.batch.item.ItemProcessor;

public class PersonItemProcessor implements ItemProcessor<Person, Person> {

    @Override
    public Person process(final Person person) throws Exception {
        final String firstName = person.getFirstName().toUpperCase();
        final String lastName = person.getLastName().toUpperCase();
        final Person transformedPerson = new Person(firstName, lastName);

        System.out.println("Converting (" + person + ") into (" + transformedPerson + ")");
        return transformedPerson;
    }
}
The Job Configuration (BatchConfiguration)
- This is where we define our job and its steps using Spring’s Java-based configuration.
import org.springframework.batch.core.Job;
import org.springframework.batch.core.Step;
import org.springframework.batch.core.job.builder.JobBuilder;
import org.springframework.batch.core.step.builder.StepBuilder;
import org.springframework.batch.item.file.FlatFileItemReader;
import org.springframework.batch.item.file.builder.FlatFileItemReaderBuilder;
import org.springframework.batch.item.file.mapping.BeanWrapperFieldSetMapper;
import org.springframework.batch.item.ItemProcessor;
import org.springframework.batch.item.ItemWriter;
import org.springframework.context.annotation.Bean;
import org.springframework.context.annotation.Configuration;
import org.springframework.core.io.ClassPathResource;

@Configuration
public class BatchConfiguration {

    // 1. Reader: Reads from people.csv
    @Bean
    public FlatFileItemReader<Person> reader() {
        return new FlatFileItemReaderBuilder<Person>()
                .name("personItemReader")
                .resource(new ClassPathResource("people.csv"))
                .delimited()
                .names(new String[]{"firstName", "lastName"})
                .fieldSetMapper(new BeanWrapperFieldSetMapper<>() {{
                    setTargetType(Person.class);
                }})
                .build();
    }

    // 2. Processor: Instantiates our custom processor
    @Bean
    public ItemProcessor<Person, Person> processor() {
        return new PersonItemProcessor();
    }

    // 3. Writer: Writes to the console
    @Bean
    public ItemWriter<Person> writer() {
        return items -> {
            System.out.println("Writing chunk of data:");
            for (Person item : items) {
                System.out.println(" -- " + item);
            }
        };
    }

    // 4. Step: Ties the reader, processor, and writer together
    @Bean
    public Step step1(ItemReader<Person> reader, ItemProcessor<Person, Person> processor, ItemWriter<Person> writer) {
        return new StepBuilder("step1", jobRepository())
                .<Person, Person>chunk(10) // Process 10 items per transaction
                .reader(reader)
                .processor(processor)
                .writer(writer)
                .build();
    }

    // 5. Job: Defines the overall job
    @Bean
    public Job importUserJob(Step step1) {
        return new JobBuilder("importUserJob", jobRepository())
                .flow(step1)
                .end()
                .build();
    }
}
Another Example (From Monew Project)
BackupBatchConfig
@Configuration
@RequiredArgsConstructor
public class BackupBatchConfig {

  private final ArticleBackupService articleBackupService;
  private final ObjectMapper objectMapper = new ObjectMapper();
  private final int chunkSize = 100;

  // ===================== Job =====================
  @Bean
  public Job backupNewsJob(
      JobRepository jobRepository,
      Step newsBackupStep
  ) {
    return new JobBuilder("backupNewsJob", jobRepository)
        .start(newsBackupStep)
        .build();
  }

  // ===================== Step (used in Job) =====================
  @Bean
  public Step newsBackupStep(
      JpaPagingItemReader<Article> newsBackupReader,
      ItemProcessor<Article, String> newsBackupProcessor,
      ItemWriter<String> newsBackupWriter,
      JobRepository jobRepository,
      PlatformTransactionManager transactionManager
  ) {
    return new StepBuilder("newsBackupStep", jobRepository)
        .<Article, String>chunk(chunkSize, transactionManager)
        .reader(newsBackupReader)
        .processor(newsBackupProcessor)
        .writer(newsBackupWriter)
        .build();
  }

  // ===================== Components in Step: ItemReader, ItemProcessor, ItemWriter =====================

  // Reader - Reads Article objects from the database for a specific date
  @Bean
  @StepScope
  public JpaPagingItemReader<Article> newsBackupReader(
      EntityManagerFactory entityManagerFactory,
      @Value("#{jobParameters['backupDate']}") String backupDateStr
  ) {
    LocalDate backupDate = LocalDate.parse(backupDateStr);

    Map<String, Object> parameters = new HashMap<>();
    parameters.put("startDate", backupDate.atStartOfDay());
    parameters.put("endDate", backupDate.plusDays(1).atStartOfDay());

    return new JpaPagingItemReaderBuilder<Article>()
        .name("articleJpaPagingItemReader")
        .entityManagerFactory(entityManagerFactory)
        .queryString("SELECT a FROM Article a "
            + "WHERE a.createdAt >= :startDate AND a.createdAt < :endDate")
        .parameterValues(parameters)
        .pageSize(chunkSize)
        .build();
  }

  // Processor - Transforms each Article object into JSON
  @Bean
  public ItemProcessor<Article, String> newsBackupProcessor() {
    // return article -> objectMapper.writeValueAsString(article)
    return objectMapper::writeValueAsString;
  }

  // Writer - Writes the processed data (JSON) to a file in AWS S3 (배치로 S3에 백업)
  @Bean
  @StepScope
  public ItemWriter<String> newsBackupWriter(
      @Value("#{jobParameters['backupDate']}") String backupDateStr
  ) {
    return articles -> {
      String aggregatedJson = String.join("\n", articles.getItems());
      String filename = String.format("articles-%s/chunk-%s.json",
          backupDateStr,
          UUID.randomUUID()
          );
      articleBackupService.backupToS3(filename, aggregatedJson);
    };
  }

}
public JpaPagingItemReader<Article> newsBackupReader@StepScope- telling Spring Batch to NOT create that bean at startup but instead create a new instance of it for every single step execution, and allow it to be configured with the
JobParametersfor that specific run - Without
@StepScope,newsBackupReaderbean is a singleton, created only once when the application starts - At that time, there are no
jobParameters, so the line@Value("#{jobParameters['backupDate']}")will fail and the application won’t start
- telling Spring Batch to NOT create that bean at startup but instead create a new instance of it for every single step execution, and allow it to be configured with the
@Value("#{jobParameters['backupDate']}") String backupDateStr- Instruction that tells Spring: When this batch step runs, find the job parameter named
backupDateand inject its value into this String variable - Only works if the bean it’s used in is annotated with
@StepScope
- Instruction that tells Spring: When this batch step runs, find the job parameter named
public ItemWriter<String> newsBackupWriter(- filenames will be now saved like:
// e.g., "articles-2025-09-10/chunk-a1b2c3d4.json"
- filenames will be now saved like:
@Component
@EnableScheduling
@RequiredArgsConstructor
@Slf4j
public class NewsBackupBatchScheduler {
  private final JobLauncher jobLauncher;
  private final Job backupNewsJob;

  @Scheduled(cron = "0 0 0 * * *")
  public void runBackupNewsSchedulerJob() {
    try {
      String backupDate = LocalDate.now().minusDays(1)
          .format(DateTimeFormatter.ISO_LOCAL_DATE);

      JobParameters params = new JobParametersBuilder()
          // `@Value` `(` `"` `#{` `jobParameters` `['backupDate']` `}` `"` `)` is FROM HERE!!!
          .addString("backupDate", backupDate)
          .addLong("timestamp", System.currentTimeMillis())
          .toJobParameters();

      jobLauncher.run(backupNewsJob, params);
      log.info("[뉴스 기사] 뉴스 기사 백업 배치 실행 완료");
    } catch (Exception e) {
      log.error("[뉴스 기사] 뉴스 기사 백업 배치 실행 실패", e);
    }
  }
}- Spring Scheduler
- automatically run your Spring Batch job at a specific, predefined time
- Like an automated alarm clock for your methods
@EnableScheduling= activation switch for Spring’s entire scheduling capability- When your Spring application starts, it scans your configuration. If it finds
@EnableSchedulingon any configuration class (or your main application class), it effectively “turns on” the scheduler. - Once enabled, Spring will then search through all of your components (like your
@Componentclass) for any methods marked with@Scheduled. It finds yourrunBackupNewsSchedulerJobmethod and registers it to be run according to its cron expression - If you remove
@EnableScheduling, the@Scheduledannotation will be completely ignored
- When your Spring application starts, it scans your configuration. If it finds
- automatically run your Spring Batch job at a specific, predefined time
@Scheduled(cron = "0 0 0 * * *")@Scheduledis what tells Spring when to execute a specific method- cron expression
0 0 0 * * *- schedules the job to run at midnight every day
LocalDate.now().minusDays(1)- backup date starts from yesterday
- Adding a
timestampto theJobParametersis a crucial best practice- Spring Batch identifies a unique “job instance” by the combination of the Job Name and its identifying Job Parameters
- Not used in
BackupBatchConfig, but crucial for controlling how Spring Batch identifies a job run ⇒ allows you to re-run the backup for the same date if it fails or if you need to do it again for any reason Job Name: "backupNewsJob"+Parameters: {backupDate="2025-09-10"}= Job Instance #1
- Not used in
- Spring Batch identifies a unique “job instance” by the combination of the Job Name and its identifying Job Parameters