Overview
The latest version of the JUnit testing framework for Java
- Basically the test-running framework, provides the basic tools to run tests (
@Test,@DisplayName, and other annotations) that define what a test is and how to run it.- Usually used with Mockito, the mocking library to create fake versions of dependencies
- Useful references
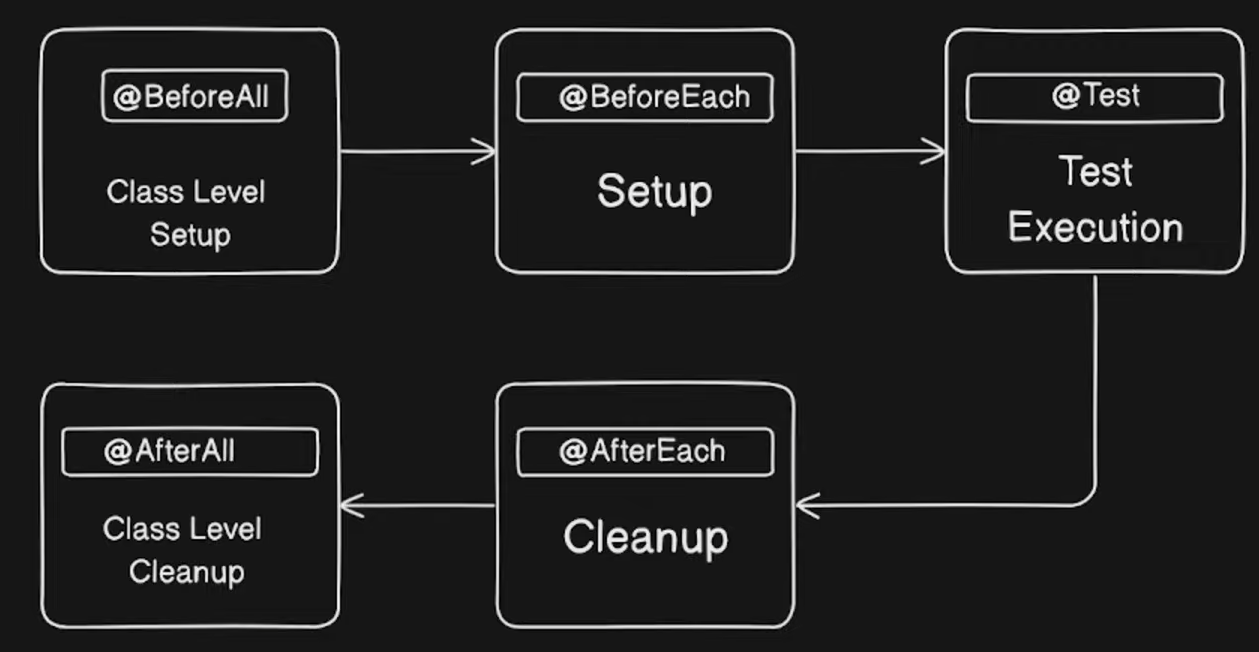
Life cycle annotations
| Annotation | Description | Execution Timing | Allowed Variable Types |
|---|---|---|---|
@DisplayName | Used for test method description | N/A | N/A |
@Test | Marks a test method | For each test method | N/A |
@BeforeAll | Runs once before all tests in a class - class level setup - needs to be static | Before the test class starts | static or with PER_CLASS lifecycle |
@BeforeEach | Runs before each test method | Before each test starts | N/A |
@AfterEach | Runs after each test method | After each test finishes | N/A |
@AfterAll | Runs once after all tests in a class - usually used for cleanup | After the test class ends | static or with PER_CLASS lifecycle |
@Test
- marks a method as a test ⇒ a single test unit executed by JUnit
- the method must return
voidand can throw exceptions - Creates a new instance of the test class for each method!
import org.junit.jupiter.api.Test;

class CalculatorTest {
    @Test
    void additionShouldWork() {
        int result = 2 + 3;
        assert result == 5;
    }
}
@BeforeEach / @AfterEach + @BeforeAll/ @AfterAll
They are used to prepare and clean up the test environment according to the test execution lifecycle stages (JUnit 5 - Test Lifecycle)
- Before/after each method
@BeforeEach- Runs before each test method
- purpose: Prepare common input values or objects
@AfterEach- Runs after each test method
- purpose: Log output, close resources
- help with isolating state between tests
- Before/after ALL methods
@BeforeAll- Runs once before any test methods in the test class
- purpose: Initialize DB connection and shared resources
@AfterAll- Runs once after all test methods in the test class have finished
- purpose: Disconnect DB, log shutdown
- ideal for expensive operations that should run only once, like setting up a database connection or external API server
- Methods annotated with these must be declared
static- they are executed at the class level, not at the object level
import org.junit.jupiter.api.*;

class CalculatorTest {

    @BeforeAll
    static void setupAll() {
        System.out.println("✔ Before All - Runs once at the start.");
    }

    @BeforeEach
    void setup() {
        System.out.println("✔ Before Each - Runs before a test.");
    }

    @Test
    void additionTest() {
        System.out.println("  -> Running first test...");
        Assertions.assertEquals(4, 2 + 2);
    }

    @Test
    void subtractionTest() {
        System.out.println("  -> Running second test...");
        Assertions.assertEquals(0, 2 - 2);
    }

    @AfterEach
    void teardown() {
        System.out.println("✔ After Each - Runs after a test.");
    }

    @AfterAll
    static void teardownAll() {
        System.out.println("✔ After All - Runs once at the end.");
    }
}
✔ Before All - Runs once at the start.
✔ Before Each - Runs before a test.
-> Running first test...
✔ After Each - Runs after a test.
✔ Before Each - Runs before a test.
-> Running second test...
✔ After Each - Runs after a test.
✔ After All - Runs once at the end.
@DisplayName - test explanation
@DisplayNamelets you give a more readable and descriptive name to your test methods- especially useful in documentation tools and test reports like JUnit HTML Report
- essential in collaborative settings to clearly convey the meaning and purpose of tests
import org.junit.jupiter.api.DisplayName;
import org.junit.jupiter.api.Test;

class DisplayNameTest {

    @Test
    @DisplayName("Average of 2 and 3 is 2.5 with a slight decimal point")
    void averageCalculationTest() {
        double avg = (2 + 3) / 2.0;
        assert avg == 2.5;
    }
}
Assertion Style + annotations
Overview
The most commonly used tool for testing whether the expected result matches the actual code execution result
BDD and Given-When-Then Style
- The phrase
given - when - thencomes from BDD (Behavior Driven Development).- Given: Setup input values and preconditions for the test
- When: Call the method under test
- Then: Verify the expected result using assertions
Common Assertion Methods (JUnit 5)
| Method | Description |
|---|---|
assertEquals(expected, actual) | Checks if expected and actual values are equal. |
assertNotEquals(unexpected, actual) | Checks if values are not equal. |
assertTrue(condition) | Checks if a condition is true. |
assertFalse(condition) | Checks if a condition is false. |
assertNull(object) | Checks if an object is null. |
assertNotNull(object) | Checks if an object is not null. |
assertThrows(expectedType, executable) | Checks if executing a block of code throws a specific exception. |
assertAll(heading, executables...) | Groups multiple assertions; runs all of them and reports all failures together. |
- Always keep the argument order consistent in
assertEquals(expected, actual) - Extract repetitive assertion logic into separate methods for reuse.
- Use clear given, when, then comments to clarify the test’s purpose
@Test
void basicAssertions() {
    // given
    int a = 2;
    int b = 3;

    // when
    int result = sum(a, b);

    // then
    assertEquals(a + b, result);              // Check expected vs actual equality
    assertNotEquals(a + b + 1, result);      // Check unexpected value difference
    assertTrue(result > 0);                   // Check condition is true

    String value = null;
    assertNull(value);                        // Check if null

    value = "Hello";
    assertNotNull(value);                     // Check not null
}

int sum(int num1, int num2) {
    return num1 + num2;
}
Grouped Assertions with assertAll()
- Use
assertAll()to verify multiple assertions within a single test - 💡 Even if one assertion fails, the others continue running, providing a full report of all verification results.
- Use
assertAll()to improve readability and maintainability
@Test
void groupAssertions() {
    // given
    String firstName = "Lee";
    String lastName = "Jungmin";

    // then
    assertAll(
        "Name validation",
        () -> assertEquals("Lee", firstName),            // Check first name
        () -> assertEquals("Jungmin", lastName),         // Check last name
        () -> assertTrue(firstName.length() <= 5)        // Check length limit
    );
}
Exception Testing: assertThrows()
- Use
assertThrows()to test scenarios where an exception is expected. - Exception handling
@Test
void exceptionTesting() {
    // when & then
    IllegalArgumentException thrown = assertThrows(
        IllegalArgumentException.class,
        () -> {
            throw new IllegalArgumentException("Invalid argument.");
        }
    );

    // Also verify the exception message
    assertEquals("Invalid argument.", thrown.getMessage());
}- The test passes only if the specified exception is actually thrown.
- Verifying the exception message improves test quality and clarity.
Example - StampCalculator
public class StampCalculator {
    public static int calculateStampCount(int nowCount, int earned) {
        return nowCount + earned;
    }

    public static int calculateEarnedStampCount(Order order) {
        return order.getOrderCoffees().stream()
                .map(OrderCoffee::getQuantity)
                .mapToInt(Integer::intValue)
                .sum();
    }
}
import org.junit.jupiter.api.DisplayName;
import org.junit.jupiter.api.Test;
import java.util.List;
import static org.junit.jupiter.api.Assertions.*;
// 테스트 대상 클래스: StampCalculator
public class StampCalculatorTest {
@Test
@DisplayName("현재 스탬프 수와 적립 스탬프 수를 더해 총합을 반환한다.")
void calculateStampCountTest() {
// given: 현재 스탬프 개수와 이번 주문으로 적립된 스탬프 수
int nowCount = 5;
int earned = 3;
// when: 스탬프 총합 계산
int actual = StampCalculator.calculateStampCount(nowCount, earned);
// then: 기대값은 8
int expected = 8;
assertEquals(expected, actual);
}
@Test
@DisplayName("주문에 포함된 모든 커피 수량을 합산해 적립 스탬프 수를 계산한다.")
void calculateEarnedStampCountTest() {
// given: 커피 2잔 각각 수량 3, 5로 설정된 주문 생성
Order order = new Order();
OrderCoffee coffee1 = new OrderCoffee();
coffee1.setQuantity(3);
OrderCoffee coffee2 = new OrderCoffee();
coffee2.setQuantity(5);
order.setOrderCoffees(List.of(coffee1, coffee2));
// when: 적립 스탬프 수 계산
int actual = StampCalculator.calculateEarnedStampCount(order);
// then: 기대값은 3 + 5 = 8
int expected = 8;
assertEquals(expected, actual);
}
}- ☑️ Both tests run independently, guaranteeing consistent results regardless of execution order
- This aligns well with the F.I.R.S.T principles, demonstrating good test design.
Test Lifecycle (PER_METHOD VS PER_CLASS)
Overview
the test lifecycle refers to the sequence that controls when instances of the test class are created and destroyed, the execution order of each test method, and the setup/teardown processes before and after tests
- Simply listing
@Testmethods is hard to maintain, so it’s important to design with the lifecycle in mind. You need to clearly understand what tasks to perform before and after tests and how state is shared or isolated between tests. - For managing test instances, JUnit 5 provides only two lifecycle modes
@TestInstance.Lifecycle.PER_METHOD- JUnit creates a brand-new instance of the test class for every single
@Testmethod - provides perfect test isolation
- default
- JUnit creates a brand-new instance of the test class for every single
@TestInstance.Lifecycle.PER_CLASS- JUnit creates only one instance of the test class and reuses it to run all the
@Testmethods within that class - good:
@BeforeAlland@AfterAllmethods no longer need to bestatic. They can be regular instance methods and can directly access and modify instance variables - bad: you lose automatic test isolation
- JUnit creates only one instance of the test class and reuses it to run all the
- Use the hooking methods appropriately
- JUnit 5 - @BeforeEach, @AfterEach, @BeforeAll, @AfterAll
- They are used to prepare and clean up the test environment according to the test execution lifecycle stages
PER_METHOD VS PER_CLASS
@TestInstance(TestInstance.Lifecycle.PER_CLASS) //TestInstance.Lifecycle.PER_METHOD
class SampleLifecycleTest {

    private int counter = 0;

    @Test
    void test1() {
        counter++;
        System.out.println("After test1, counter = " + counter);
    }

    @Test
    void test2() {
        counter++;
        System.out.println("After test2, counter = " + counter);
    }
}
PER_METHOD
test1 실행 후 counter = 1
test2 실행 후 counter = 1
- Each method creates new instances, so the counter resets every time
PER_CLASS
test1 실행 후 counter = 1
test2 실행 후 counter = 2
- They share one instance so counter is also shared
Ordering tests
- JUnit 5 does not guarantee the execution order of test methods to avoid dependencies between tests
- The order may change each time depending on JVM method loading or the test execution environment!!
- enforces test independence → Tests should be designed so they do not rely on execution order
- Recommendation: It’s best practice to design tests so they do not depend on execution order, as this improves maintainability
- When you need to explicitly define the execution order of tests, use JUnit 5’s
@TestMethodOrderannotation
Available MethodOrderers
| Type | Description |
|---|---|
OrderAnnotation | Executes tests in the order specified by @Order annotations- this is used in the above example |
DisplayName | Executes tests in alphabetical order of test names (display names) |
MethodName | Executes tests alphabetically by method name |
Random | Executes tests in random order (useful to verify test isolation) |
OrderAnnotation.class
@SpringBootTest
@TestMethodOrder(MethodOrderer.OrderAnnotation.class)
class OrderedTests {

    @Test
    @Order(1)
    void firstTest() {
        // Executes first
    }

    @Test
    @Order(2)
    void secondTest() {
        // Executes second
    }
}
MethodName.class
@TestMethodOrder(MethodOrderer.MethodName.class)
class AlphabeticalOrderTest {

    @Test
    void b_test() {
        System.out.println("Running: b_test");
    }

    @Test
    void a_test() {
        System.out.println("Running: a_test");
    }
}
Running: a_test
Running: b_test
When testing
| Scenario | Recommended? | Explanation |
|---|---|---|
| Unit Test | ❌ Not recommended | Tests should be independently executable and order-agnostic. |
| Integration Test | ⚠️ Limited allowance | In complex setup-verify-teardown workflows, enforcing order may be necessary. |
| Database Scenario Tests | ✅ Allowed | For example, when verifying operations in a sequence like create → update → delete. |
Nested - @Nested
@Nested- allows you to group related tests by using inner classes inside a test class.
- better readability - It helps organize tests by grouping similar functionalities together
- You can define
@BeforeEach,@AfterEach, and other lifecycle hooks separately within each nested class. - Enables managing test code in a hierarchical structure.
class UserServiceTest {

    @Nested
    class LoginTest {
        @BeforeEach
        void setupLogin() {
            System.out.println("[Login 준비]");
        }

        @Test
        void successLogin() {
            System.out.println("로그인 성공");
        }
    }

    @Nested
    class SignupTest {
        @BeforeEach
        void setupSignup() {
            System.out.println("[Signup 준비]");
        }

        @Test
        void successSignup() {
            System.out.println("회원가입 성공");
        }
    }
}@BeforeEach,@AfterEach, and similar lifecycle annotations apply only within the scope of the specific@Nestedclass they are declared in.- They do not affect the outer class or sibling nested classes.
[Login 준비]
로그인 성공
[Signup 준비]
회원가입 성공