OAuth 2.0
Overview
OAuth 2.0 is an authorization framework that allows a third-party application to get limited access to your data on another service, without you having to give the application your password.
- Used for Authorization
- Resources
- What is Oauth 2 (auth0)
- Different workflows can be seen here
- What is Oauth 2 (auth0)
Flow
- Example 1: Using Google Calendar
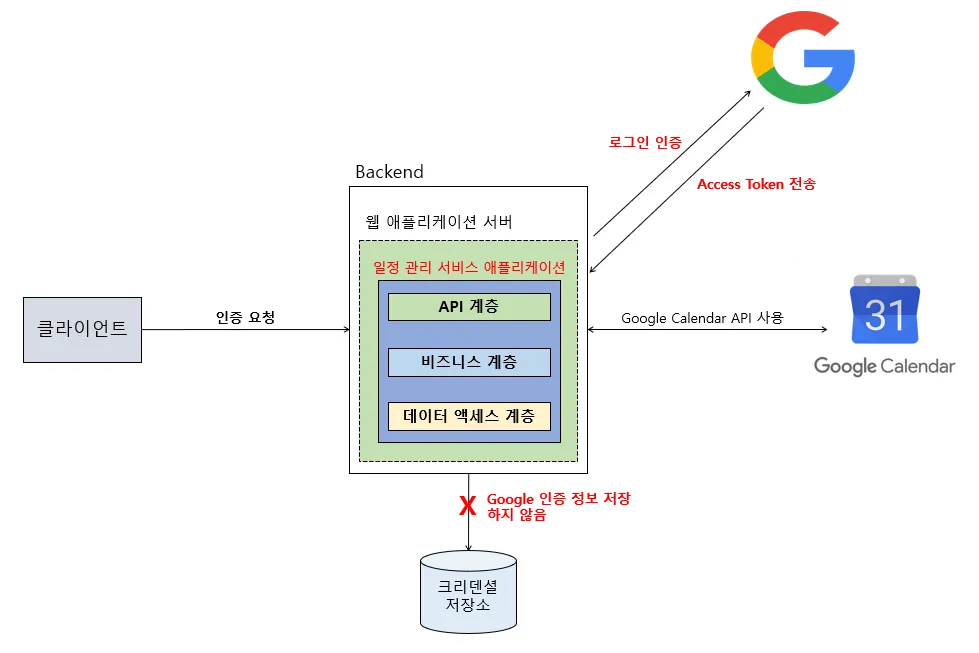
Example with Authorization Code grant
- The User Initiates the Request
- You are in a third-party app (the Client) and click a button like “Connect to Google Calendar.”
- The App Redirects You to Google
- The app sends you to Google’s Authorization Server (Google) with a specific request, asking for permission to access your calendar.
- The specific request includes:
client_id: Identifies the app.scope: The specific permission needed (e.g.,calendar.readonly).redirect_uri: Where to send the user back.
- You Log In and Grant Consent
- You securely enter your username and password directly on Google’s site. The third-party app never sees your credentials.
- Google then shows you a consent screen listing the permissions the app wants (e.g., “View and edit your calendars”). You click “Allow.”
- Google Sends a Temporary Code
- Google’s Authorization Server (Google) redirects you back to the app, including a short-lived, one-time-use Authorization Code in the URL. This is not the final token.
- The App Exchanges the Code for a Token
- In the background, the app’s server securely sends the Authorization Code back to Google’s Authorization Server. This proves the request is legitimate.
- Google Issues the Access Token
- The Authorization Server (Google) verifies the code and finally sends the valuable Access Token back to the app’s server.
- The App Accesses Your Data
- The app now includes this Access Token in the
Authorizationheader of its requests to the Google Calendar API (the Resource Server). The API validates the token and, if it’s valid, returns your calendar data.
- The app now includes this Access Token in the
Roles
- **Resource Owner (User)
- The user or system that owns the protected resources and can grant access to them.
- This is you, the actual user who owns the data
- **Client
- The client is the system that requires access to the protected resources. To access resources, the Client must hold the appropriate Access Token.
- Can be server, the web, mobile etc.
- Ex) If Bob is using a scheduling app (App A), and this app needs access to the Google Calendar API, then App A is the Client.
- **Authorization Server
- This server receives requests from the Client for Access Tokens and issues them upon successful authentication and consent by the Resource Owner.
- The authorization server exposes two endpoints: the Authorization endpoint, which handles the interactive authentication and consent of the user, and the Token endpoint, which is involved in a machine to machine interaction.
- Ex) Google’s login page
- **Resource Server
- A server that protects the user’s resources and receives access requests from the Client. It accepts and validates an Access Token from the Client and returns the appropriate resources to it.
- Ex) Google calendar API
OpenID Connect
Overview
OIDC is an authentication protocol built on top of OAuth 2.0.
- In addition to the Access Token issued through the OAuth 2.0 flow, OIDC issues an ID Token (JWT-based) that provides the user’s authentication information.
- This allows client applications to identify who the user is (e.g., name, email, profile picture).
- The main difference is that the OpenID Connect (OIDC) flow asks for a special permission (
openidscope) and gets back an extra token (ID Token) that contains the user’s identity information.
How it works
- The OIDC flow looks almost identical to the OAuth 2.0 flow, but with one key difference. When the application sends you to log in with Google, it requests special permissions called scopes, specifically the
openidscope, and oftenprofileandemailas well. - Because it requested the
openidscope, Google’s response includes two critical items:- Access Token: The standard OAuth 2.0 “key card” that grants authorization to access APIs (like the Calendar API).
- ID Token: This is the OIDC “ID card.” It’s a special type of token (a JWT - JSON Web Token) that contains verifiable claims about you.
ID Token
- The ID Token is the core of OIDC. It’s a secure package of information that proves your identity to the application.
- Issued in JWT (JSON Web Token) format, containing the result of user authentication along with basic profile information.
- A decoded ID Token contains standard information like:
iss: The issuer (who sent the token, e.g.,https://accounts.google.com).sub: The subject (your unique user ID from that issuer).aud: The audience (who the token is for, i.e., the application’s client ID).exp: The expiration time.email: Your email address.name: Your full name.
{
  "iss": "<https://accounts.google.com>", // 발급자
  "sub": "1234567890",                 // 사용자 고유 식별자
  "aud": "my-client-id",              // 토큰을 받을 Client ID
  "exp": 1672531199,                   // 만료 시간
  "iat": 1672527599,                   // 발급 시간
  "email": "user@example.com",        // 사용자 이메일
  "name": "홍길동"                      // 사용자 이름
}
- The application can then check the digital signature on this ID Token to trust that it really came from Google and that the information is accurate. It can then use this info to create an account for you or log you in, displaying “Hello, John Smith!” on the screen.
OAuth 2.0 VS OpenID Connect flow
OAuth
- Initiation: The app asks for permission to access a resource.
- Example: “Can I have permission to read your Google Calendar?”
- Redirect to Provider: The app redirects the user to Google with a request that includes:
client_id: Identifies the app.scope: The specific permission needed (e.g.,calendar.readonly).redirect_uri: Where to send the user back.
- Consent: The user logs in and consents to the request (“Allow app to read calendar”).
- Redirection with Code: Google redirects the user back to the app with a temporary
authorization_code. - Token Exchange: The app’s server sends the
authorization_codeto Google. - Result: Google returns an
Access Token. The app can now use this token to access the Google Calendar API. It is authorized but doesn’t know who the user is.
OpenID
- Initiation: The app asks to verify the user’s identity.
- Example: “Can I log you in using your Google account?”
- Redirect to Provider: The app redirects the user to Google with a request that includes:
client_id: Identifies the app.scope:openid(and oftenprofile,email). ⇐ Key Difference #1redirect_uri: Where to send the user back.
- Consent: The user logs in and consents to the request (“Allow app to see your name and email”).
- Redirection with Code: Google redirects the user back to the app with a temporary
authorization_code. - Token Exchange: The app’s server sends the
authorization_codeto Google. - Result: Google returns two tokens: ⇐ Key Difference #2
- An
Access Token: For authorization (if other scopes were requested). - An
ID Token: A JWT containing user info (name, email, unique ID).
- An