Overview
Upon successful login, the server issues a signed token. The client then includes this token in the Authorization header for every request, and the server verifies the signature to confirm identity.
- Components
- Access Token (short-lived)
- Refresh Token (long-lived, for reissuance)
- key management (secret key or public/private key pair)
- Token handles both authentication AND authorization
- Authorization after Authentication: Token-based Authorization
Characteristics
- Advantages
- By not storing authentication state on the server, token-based methods are highly advantageous for scalability.
- Well-suited for client-side rendering (CSR) applications.
- Disadvantages
- Once issued, a token remains valid until it expires. To force invalidation (e.g., logout, compromised token), mechanisms like a blacklist or a token version field must be introduced.
- Tokens may include unencrypted user information, so sensitive data must never be embedded directly in the token
- Since tokens often include user information, they can cause higher network traffic compared to sessions.
- Because the server does not manage tokens directly, more careful security design is required as well.
- Characteristics
- Tokens generally cannot be invalidated before expiration.
- With token-based authentication, revocation is inherently difficult. However, it can be mitigated by maintaining a blacklist in an in-memory DB (e.g., Redis) and issuing tokens with short expiration times.
- Tokens are transmitted in the
Authorizationheader- sessions use
Set-Cookieheader
- sessions use
- Handles BOTH Authentication & Authorization!!
- Authentication: You log in with your username and password. The server verifies who you are and gives you a token. This token is your proof of authentication.
- Authorization: The crucial part is that the server can embed your permissions directly into the token’s data payload.
Flow
- The exchange happens in the request/response bodies and not headers
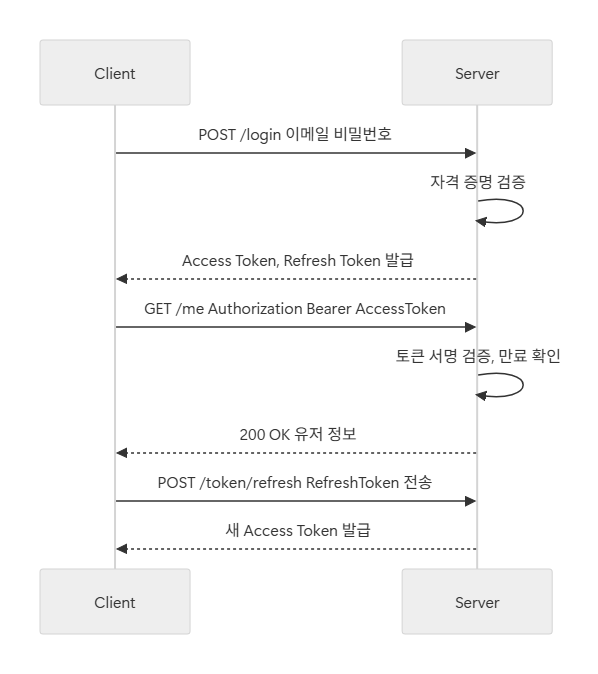
Example Process 1
- The user sends a login request with username and password.
POST /api/login HTTP/1.1
Host: example.com
Content-Type: application/json

{
  "username": "alex",
  "password": "user_password123"
}
- The server verifies the user’s credentials.
- If verification succeeds, the server issues a token by sending the token back in the JSON body of the HTTP response
- If credentials are valid, the server generates both a short-lived
accessTokenand a long-livedrefreshToken. - It sends the
accessTokenin the JSON body. - It sends the
refreshTokenin a secure,HttpOnlycookie.
- If credentials are valid, the server generates both a short-lived
HTTP/1.1 200 OK
Content-Type: application/json
Set-Cookie: refreshToken=aVeryLongAndSecureRefreshTokenString; HttpOnly; Secure; Path=/api/refresh
{
  "message": "Login successful!",
  "accessToken": "eyJhbGciOiJIUzI1NiIsInR5cCI6IkpXVCJ9.eyJ1c2VySWQiOiIxMjMiLCJpYXQiOjE2MTYyMzkwMjJ9.SflKxwRJSMeKKF2QT4fwpMeJf36POk6yJV_adQssw5c"
}
- The client stores the tokens.
accesstoken- typically in memory (a variable, state management memory, or localStorage)refreshToken- browser automatically stores this as a securehttpOnlycookie
- For subsequent requests, the client includes the
accessTokenin the Authorization header.- for regular API calls like this, the client only sends the
accessToken
- for regular API calls like this, the client only sends the
GET /api/user/profile HTTP/1.1
Host: example.com
Authorization: Bearer eyJhbGciOiJIUzI1NiIsInR5cCI6IkpXVCJ9.eyJ1c2VySWQiOiIxMjMiLCJpYXQiOjE2MTYyMzkwMjJ9.SflKxwRJSMeKKF2QT4fwpMeJf36POk6yJV_adQssw5c
- The server validates the token and processes the request.
Example Process 2 - accessToken expires
- The original
accessToken(which might only be valid for 15 minutes) has now expired. - Client Tries to Make Another API Call
- The client doesn’t know the token has expired yet, so it sends the same request as in Step 5, but with the expired token.
GET /api/user/orders HTTP/1.1
Host: example.com
Authorization: Bearer eyJhbGciOiJIUzI1NiIsInR5cCI6IkpXVCJ9.eyJ1c2VySWQiOiIxMjMiLCJpYXQiOjE2MTYyMzkwMjJ9.SflKxwRJSMeKKF2QT4fwpMeJf36POk6yJV_adQssw5c
- Server Rejects the Expired Token
- The server validates the token, sees that it’s expired, and rejects the request with a
401 Unauthorizedstatus code.
- The server validates the token, sees that it’s expired, and rejects the request with a
- Client Handles the 401 Error (The “Refresh” Logic)
- The client is programmed to handle
401errors. Instead of logging the user out, it first tries to get a new access token. - It makes a
POSTrequest to the refresh endpoint (e.g.,/api/refresh). - NO
Authorizationheader here → The browser automatically attaches therefreshTokencookie to this request (refreshTokenis only sent whenaccessTokenexpires & you need a new one)
- The client is programmed to handle
POST /api/refresh HTTP/1.1
Host: example.com
- Server validates refresh token and issues new
accessTokenandrefreshToken- The server receives the request at
/api/refresh - The server looks at the
refreshTokenit received and verifies that it is valid and has not expired, and if it’s good:- it generates a brand new
accessToken& sends this new token back in the JSON body - it immediately invalidates that old
refreshTokenand issues a brand new one along with the new access token
- it generates a brand new
- The server receives the request at
HTTP/1.1 200 OK
Content-Type: application/json
Set-Cookie: refreshToken=a_BRAND_NEW_refresh_token_string; HttpOnly; Secure; Path=/api/refresh
{
  "accessToken": "a_NEW_short_lived_access_token"
}
- Client Retries the Original Request
- The client receives the new
accessTokenand updates the one it has in memory. - It now automatically retries the failed request from Step 8, but this time with the new, valid token.
- The client receives the new
GET /api/user/orders HTTP/1.1
Host: example.com
Authorization: Bearer a_NEW_short_lived_access_token
Remember
- For all regular API calls, the client only sends the Access Token (w/o the Refresh Token) , typically in the
Authorizationheader.- When an API call fails with a
401 Unauthorizederror, the client then makes a special request to the/refreshendpoint. The browser automatically attaches the Refresh Token (as a secure cookie) to this one request to get a new Access Token.
Diagram
Authorization Header
Overview
A standard HTTP header used to send authentication information from the client to the server.
- Location: Included in the header section of an HTTP request.
- Purpose: Allows the server to verify the client’s identity and grant access to protected resources.
Example with Basic authentication credentials:
GET /protected-resource HTTP/1.1
Host: example.com
Authorization: Basic dXNlcjpwYXNz
Structure
Authorization: <auth-scheme> <credentials>
- Basic Authentication
Authorization: Basic dXNlcjpwYXNz- Sends
username:passwordencoded in Base64. - Very simple but insecure — must only be used over HTTPS.
- Not used in prod settings
- Bearer Token Authentication
Authorization: Bearer eyJhbGciOi...- Typically used to transmit an access token (e.g., JWT) → more in detail later
- “The bearer of this token is authorized” → possession of the token grants access.
- Used the most!
- Digest Authentication
Authorization: Digest username="Mufasa", realm="testrealm@host.com", ...- Uses a
nonceand hashing to verify credentials without sending the password directly. - Once common, but now largely replaced by Bearer/JWT methods.
JWT (JSON Web Token)
Overview
An open standard (RFC 7519) that defines a compact and self-contained way for securely transmitting information between parties as a JSON object
- Use cases
- Authorization: This is the most common scenario for using JWT. Once the user is logged in, each subsequent request will include the JWT, allowing the user to access routes, services, and resources that are permitted with that token
- Information Exchange: JSON Web Tokens are a good way of securely transmitting information between parties
- Characteristics
- Stores user information in JSON format.
- Encodes the information with Base64URL.
- Finally, adds a signature using a secret key and algorithm to prevent tampering.
Structure
- Consists of 3 parts separated by dots
.
xxxxx.yyyyy.zzzzz
Header
- typically consists of two parts:
- the type of the token, which is JWT
typ: token type (JWT)
- the signing algorithm being used, such as HMAC SHA256 or RSA
alg: algorithm
- the type of the token, which is JWT
- this JSON is Base64Url encoded to form the first part of the JWT
{
  "alg": "HS256",
  "typ": "JWT"
}
Payload
- Contains user-specific information, roles/permissions, and metadata such as the token’s issued-at time (
iat).- contains the Claims → statements about an entity (typically, the user) and additional data. Types of claims:
registerediss,sub,exp,iat, etc
public- public information
role,department,nickname
private- used only internally in the service
userId,sessionId
- Sensitive data should never be stored directly in the payload.
- When Base64URL-encoded, this becomes the second part of the JWT.
// example 1
{
  "sub": "user123",
  "name": "Alice",
  "iat": 1516239022
}

// example 2 - with roles
{
  "sub": "alice",
  "roles": ["USER", "EDITOR"],
  "iat": 1737072000,
  "exp": 1737075600
}
Signature
Signature = Sign( base64UrlEncode(Header) + "." + base64UrlEncode(Payload), secretKey )
HMACSHA256(
  base64UrlEncode(header) + "." + base64UrlEncode(payload),
  secret
)
- Generated using the server’s secret key.
- Ensures the token hasn’t been tampered with and validates its authenticity (integrity).
Access Token VS Refresh Token
Access Tokens
- Usually they are divided like this for security
- Improved User Experience
- Users don’t need to log in repeatedly.
- When an Access Token expires, a new one can be automatically issued using the Refresh Token
- Access Tokens are issued with a short expiration, so even if stolen, they quickly become useless.
| Feature | Access Token | Refresh Token |
|---|---|---|
| Purpose | Grants access to protected resources like APIs (Used for actual API requests) | Used to obtain a new Access Token after the old one expires. |
| Lifetime / Expiration | Short-lived (minutes ~ hr). | Long-lived (days, weeks, or even months). |
| Storage | Stored in client memory or browser storage. | Stored in a secure, persistent location (e.g., an HttpOnly cookie). |
| Security Risk | If stolen, its short lifespan limits potential damage. | If stolen, it has a long lifespan, requiring much stronger protection. |
Refresh Tokens
- Mobile apps should store Refresh Tokens in Secure Storage (e.g., Keychain on iOS, Keystore on Android).
- Browser environments should manage Refresh Tokens using cookies with
HttpOnly + Secure + SameSiteflags.- typically sent separately from the access token for security reasons, most often in a secure,
HttpOnlycookie - Cookie Attributes
- typically sent separately from the access token for security reasons, most often in a secure,
- Refresh Tokens should also be stored on the server (in a database or Redis), and the server must always verify their expiration and revocation status.
Comparison
| Feature | Access Token | Refresh Token |
|---|---|---|
| Purpose | To authorize access to protected resources (APIs). | To obtain a new access token. |
| Common Format | JWT | Opaque String (stored in a database) or sometimes a JWT. |
| Stateless? | Yes (this is its main benefit). | Depends. No if it’s an opaque string, Yes if it’s a JWT. |
| Lifetime ⏳ | Short (minutes to an hour). | Long (days to months). |
| Sent to | Every protected API endpoint. | Only the dedicated token refresh endpoint. |
Token Renewal Flow
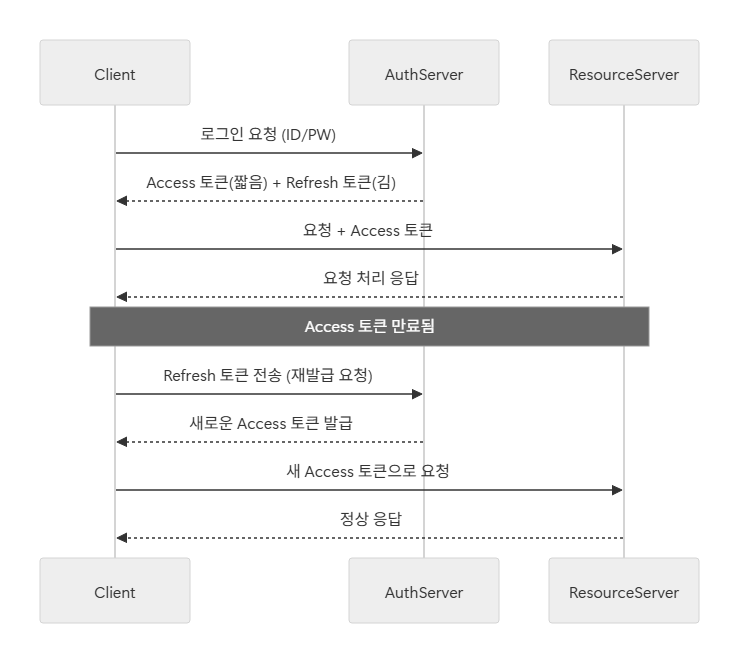
Example process (using JWT)
Suppose App A needs to integrate with Gmail to read emails:
- The user logs in to Gmail’s authentication server (providing ID and password).
- Upon successful authentication, Gmail issues a JWT.
- App A includes this JWT in the
Authorizationheader of requests to the Gmail API. - The Gmail server verifies the JWT signature and, if valid, returns the requested email data. ➡️ This way, the user doesn’t have to give App A their Gmail password directly, but App A can still access Gmail securely using the token.
Tips
- Never Include Sensitive Information
- JWTs are only Base64URL encoded, not encrypted.
- Do not put sensitive data such as passwords, SSNs, or personal identifiers inside a token.
- Set Expiration Times
- Always define an
exp(expiration) for the token. - Tokens without expiration can be abused indefinitely if stolen.
- Always define an
- Use HTTPS
- JWTs are transmitted over the network.
- They should only be sent over HTTPS to ensure encryption in transit.
- Be Careful with Storage
- Avoid storing tokens in
localStoragesince it’s highly vulnerable to XSS attacks. - Prefer HTTPOnly cookies or secured session storage instead.
- Avoid storing tokens in
- Token Revocation Strategy
- By design, JWTs cannot be invalidated until they expire.
- To compensate, you can:
- Maintain a blacklist of revoked tokens on the server, or
- Use an in-memory database (e.g., Redis) to track invalid tokens.